
Draft. This manual is new and still growing. If something here does not match what you see in the software, the software is right — tell us and we will fix the page.
Mesh independence study
At the end of this you will have one case holding three simulations of the same body on three meshes, and a defensible answer to the question every review asks: is that number a property of the flow, or a property of your mesh?
Runs on the free tier, provided all three meshes fit inside the 250,000-cell cap. That is why this tutorial builds on the two-dimensional cylinder — a 2-D mesh is one cell thick, so you can triple the resolution twice and still fit.
Before you start
Work through Flow over a cylinder first and keep the case. Everything below starts from it.
If you would rather see the pattern before building it, open the External aerodynamics - streamlined hull worked example from the home screen. It ships with three simulations already in the case — a baseline, a Mesh check - fine variant, and a second turbulence model — for exactly the reason this tutorial exists.
Commands are on the ribbon's Model tab: Duplicate in the SIMULATION group, Generate mesh in MESH, Start run and Continue in RUN, and Comparison in STUDY.
What a case actually is
This is the idea the whole tutorial rests on, and it is stated in Your first simulation:
A case is one body and any number of studies of it. The geometry belongs to the case. The mesh, the physics, the run and the results belong to a simulation inside it.
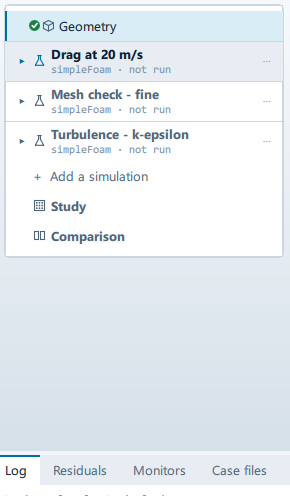
That is why the setup tree has Geometry once at the top and everything else repeated under each simulation heading. Changing the mesh in one simulation does not touch the others, and none of them has its own copy of the body.
Only the open simulation is expanded in the tree. Every pane below a heading binds to the live case properties, and only one simulation is live at a time — drawing another one's steps would show this one's values under its name.
1. Name the baseline
Open your cylinder case.
Click the ⋯ on the simulation heading in the setup tree and choose
Rename…. Call it something that says what it is: Coarse, or Base cell 4 mm. You are about to have three of these and "Simulation 1" will not help you.
Under the heading name the tree shows the solver and the outcome —
converged, failed, or meshed / not run if it has not been solved. That
line is how you tell at a glance which studies are done.
2. Record what the baseline actually was
Before duplicating anything, note two numbers from the baseline:
- Base cell size under Mesh.
- The achieved cell count, which Mesh reports as the second line of the
estimate block:
Current mesh: … M cells, directly underEstimate: … M cells.
A mesh study is only meaningful if you know the refinement ratio between the meshes, and the base cell size is what you will be changing.
3. Duplicate it
Click the ⋯ on the simulation heading again and choose Duplicate.
A copy appears named … copy and the application switches to it immediately.
The copy carries the entire setup — physics, materials, boundary conditions,
result control, numerics — and not the mesh or the results. Its own run
directory is empty, so the two studies cannot write over one another.
That is precisely what you want. Everything must be identical except the mesh. A study that changes the mesh and the turbulence model at the same time tells you nothing about either.
Rename the copy to say what it is: Medium, or the base cell size you are about
to give it.
4. Refine the copy
With the copy open, select Mesh and reduce Base cell size.
Halving it is the conventional step, and in two dimensions it multiplies the cell count by roughly four. A factor of 1.5 is gentler and still large enough to see. Whichever you pick, use the same ratio between all three meshes — a study on ratios of 2 and then 1.2 is much harder to read.
Watch the estimate as you type:
Estimate: … M cells (over the … M budget)
If the amber "over the budget" note appears, you have gone past what the free tier will run. Back off, or raise the ratio on the coarse end instead of the fine end.
Under Refinements, leave Level min, Level max and Cells between alone. Changing the base cell size scales the whole mesh uniformly, which is what a mesh study needs; changing the refinement levels as well refines some places and not others, and the comparison stops being about resolution.
Boundary layers deserves a decision rather than a default. Two positions are defensible:
- Leave Target y+ fixed. The near-wall resolution then stays constant while the bulk mesh refines, which isolates the effect you are looking for.
- Scale the layers with the mesh. More realistic, and it confounds two effects.
Take the first for a first study, and say in the report which you did.
Press Generate mesh and check Quality.
5. Do it again
Duplicate once more — from either existing simulation, since the setup is the
same — rename it Fine, and reduce Base cell size by the same ratio again.
You now have three simulations under one Geometry node.
6. Run all three
Select each simulation in turn — click its heading in the tree — and run it from Simulation runs, that simulation's own node. Start run in the ribbon's RUN group does the same thing without leaving the pane you are on.
Two things to check every time, because a mesh study built from a bad run is worse than no mesh study:
- The run converged. Not "the residuals fell a bit". A coarse mesh often converges easily and a fine one does not; if the fine run is still drifting when it stops, its number is not comparable to the others.
- The monitored quantity settled. Watch Cd and Cl in Monitors. Flat lines, not a trend.
If a run stops with the coefficients still moving, press Continue for 1000 more iterations on the run's own pane — or Continue in the ribbon's RUN group — rather than starting over.
The simulation headings in the tree fill in as you go — converged in green,
failed in red — so you can see which are done without opening them.
7. The Comparison node
Two nodes sit at the bottom of the setup tree, below the simulations rather than inside any of them. Study is there from the start: it is what generates simulations, so it has something to do before there is anything to compare. Comparison appears only once there is more than one simulation, because that is when it starts meaning something.
Select Comparison. It is also in the ribbon's STUDY group.
You get one block per simulation, all on the same basis:
| Row | What to look at |
|---|---|
| Solver | Must be the same across all three. If it is not, you have changed the physics. |
| Turbulence | Likewise. |
| Cells | The actual meshed count, or not meshed. |
| Base cell | The thing you varied. |
| Target y+ | Confirms the near-wall treatment did not drift. |
| Iterations | How long each was given. |
Each block also shows how the run ended, and a study that has not been run says
not run rather than showing a blank. The pane says why that matters: "a study
that has not been run says so rather than showing a blank" — because a
comparison that looks too good is usually a comparison against nothing.
Open this simulation on any block that is not the current one takes you there.
8. Reading the result
The Comparison pane gives you the setups side by side. The answer — Cd, Cl — comes from each simulation's run, under Simulation runs, and its monitors. Write the three values down.
Then the judgement, which no software can make for you:
If the answer changes by a large amount between coarse and medium, and by a much smaller amount between medium and fine, the solution is converging on the mesh and the fine value is the answer. The remaining change between medium and fine is your discretisation uncertainty, and it is the number to quote alongside the result.
If it changes by a similar amount at both steps, it has not converged. You do not have a result yet; you have a sequence. Refine further, and be suspicious of anything you concluded from the coarse mesh.
If it moves erratically — up, then down — something other than resolution is changing. Check that the three runs really did converge, check that the turbulence model and the solver match in the Comparison table, and check the mesh quality on each. An unconverged run in the middle of a sequence looks exactly like non-monotonic mesh convergence.
9. Derived quantities
Further down the Comparison pane there is a Derived quantities section. It exists because the coefficients mean different things for different machines, and the application does not know what you are building.
Press + Add a derived quantity. Each one has an editable name, an expression and a unit. Expressions are ordinary arithmetic over the case's own symbols; expand What you can use in an expression to see every symbol, its current value, and the functions available, and click a name to copy it.
The unit is a label. It is not checked against the expression, and the pane says so — it is on you to make it true.
For a mesh study, a derived quantity that turns Cd into the force or the power your machine actually sees is the thing to put in front of a reviewer. A change of a few per cent in Cd is abstract; the same change in watts is not.
10. The comparison report
At the bottom of the pane, Export comparison report produces one PDF covering every study in the case: the table above, then each study's own setup and results. The per-simulation report is still under Report inside each simulation.
That single document is the deliverable. A drag number with no mesh study behind it is an opinion; the same number with three meshes and a converging sequence is a result.
On the free tier the report is watermarked. Everything in it is real.
What you should see
Three converged runs, identical in everything but base cell size, with a quantity of interest that moves less between the second and third than it did between the first and second.
If all three give the same answer to several figures, your coarse mesh was already adequate — which is a good outcome and worth knowing, because it means the cheap mesh is the one to use for the next fifty runs.
What to try next
- Change the turbulence model instead of the mesh. Duplicate the finest simulation, change Model under Models, run it, and compare. That is the second question every review asks, and the Comparison table has a Turbulence row waiting for it.
- External aerodynamics — the same study on a 3-D body, where the cell counts are large enough that knowing which mesh you can get away with is worth real money.
- Concepts for mesh independence and convergence as ideas rather than as a procedure.